You can read this post on the OpenShift Blog.
. ├── auth │ ├── kubeadmin-password │ └── kubeconfig ├── bootstrap.ign ├── master.ign ├── metadata.json └── worker.ign
You can read this post on the OpenShift Blog.
I recently decided to deploy OpenShift 4.3 and CNV 2.2 on Packet.net. I wanted to share my experience in the hope it my help others. Of course, you should always default to the real documentation. Lots of people from Red Hat helped me along the way, so thanks to all of you!
Before we dive into the step by step here are some things you should know:
This diagram attempts to explain what you’ll have when you are done.
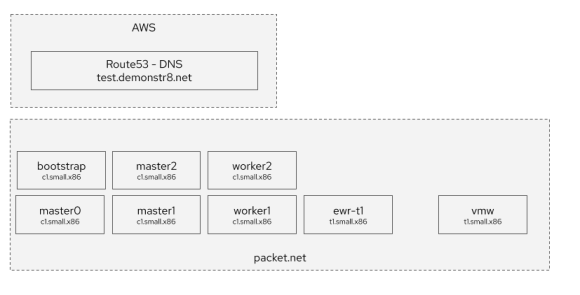
You will have:
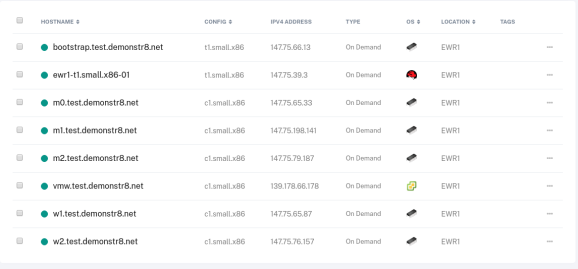
Your servers in Packet.net will look like this.
Let’s get started ….
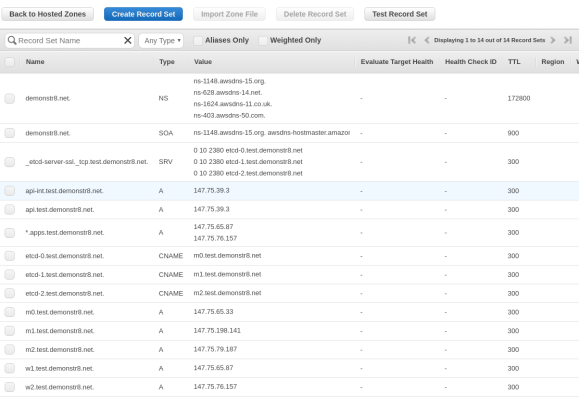
You’ll want to create the records as shown in the image below in Route 53. I created a domain named demonstr8.net with a subdomain of test. We will change the values of the entries after we iPXE the bare metal servers in Packet.net. This is because we can’t control what IP addresses our machines will receive. The friendly folks at packet.net are working on project tinkerbell to help address this and make life easier.
The first step is deploying a small instance that will host various services. If you don’t feel like learning all of this you could check out Christian Hernandez‘s ocp4-helpernode that makes this easier. Another great resource is Mike Hepburn’s disconnected install markup here.
For now, just deploy a single server with the following characteristics:
Next, deploy a 100GB storage volume and connect it to ewr-t1. We will do this so we can have some storage for a NFS export for persistent volumes in OpenShift. You’ll want to follow this handy guide for attaching the volume. I mounted the file system on /mnt/data. In the end you should have something that looks like this.
[root@ewr1-t1 ~]# df -h
Filesystem Size Used Avail Use% Mounted on
/dev/sda3 72G 9.0G 59G 14% /
devtmpfs 3.9G 0 3.9G 0% /dev
tmpfs 3.9G 84K 3.9G 1% /dev/shm
tmpfs 3.9G 153M 3.8G 4% /run
tmpfs 3.9G 0 3.9G 0% /sys/fs/cgroup
tmpfs 798M 4.0K 798M 1% /run/user/0
/dev/mapper/volume-9201b23a1 99G 61M 94G 1% /mnt/data
[root@ewr1-t1 ~]#
Now let’s set up the following on the server: NFS, HAproxy, and Apache. Before we do that let’s add the repositories we will need.
# yum-config-manager --add-repo rhel-7-servers-rpms
# yum-config-manager --add-repo rhel-7-servers-extras-rpms
Let’s also add all the ports to the firewall that we will need for haproxy, nfs, apache.
# firewall-cmd --add-port=80/tcp
# firewall-cmd --add-port=443/tcp
# firewall-cmd --add-port=8080/tcp
# firewall-cmd --add-port=8088/tcp
# firewall-cmd --add-port=6443/tcp
# firewall-cmd --add-port=22623/tcp
# firewall-cmd --add-port=2376/tcp
# firewall-cmd --add-port=2376/udp
# firewall-cmd --add-port=111/tcp
# firewall-cmd --add-port=662/tcp
# firewall-cmd --add-port=875/tcp
# firewall-cmd --add-port=892/tcp
# firewall-cmd --add-port=2049/tcp
# firewall-cmd --add-port=32803/tcp
# firewall-cmd --add-port=111/udp
# firewall-cmd --add-port=662/udp
# firewall-cmd --add-port=875/udp
# firewall-cmd --add-port=892/udp
# firewall-cmd --add-port=2049/udp
# firewall-cmd --add-port=32803/udp
# firewall-cmd --runtime-to-permanent
Let’s install nfs. This will be used to provide persistent storage to our OpenShift environment.
# yum install nfs-utils
and then set up the /etc/exports file with the following
/mnt/data *(rw,root_squash)
and let’s start nfs
# service nfs start
You can validate your are exporting nfs with the following
# exportfs
/mnt/data <world>
Let’s install haproxy. Haproxy will be used to provide L4 load balancing to our OpenShift environment.
# yum install haproxy
and then set up the /etc/haproxy/haproxy.cfg file with the following. Note, we will change these values once we actually provision the environment.
defaults
	mode                	http
	log                 	global
	option              	httplog
	option              	dontlognull
	option forwardfor   	except 127.0.0.0/8
	option              	redispatch
	retries             	3
	timeout http-request	10s
	timeout queue       	1m
	timeout connect     	10s
	timeout client      	300s
	timeout server      	300s
	timeout http-keep-alive 10s
	timeout check       	10s
	maxconn             	20000

# Useful for debugging, dangerous for production
listen stats
	bind :9000
	mode http
	stats enable
	stats uri /

frontend openshift-api-server
	bind *:6443
	default_backend openshift-api-server
	mode tcp
	option tcplog

backend openshift-api-server
	balance source
	mode tcp
	server master-0 147.75.65.33:6443 check
	server master-1 147.75.198.141:6443 check
	server master-2 147.75.79.187:6443 check

frontend machine-config-server
	bind *:22623
	default_backend machine-config-server
	mode tcp
	option tcplog

backend machine-config-server
	balance source
	mode tcp
        server master-0 147.75.65.33:22623 check
        server master-1 147.75.198.141:22623 check
        server master-2 147.75.79.187:22623 check

frontend ingress-http
	bind *:80
	default_backend ingress-http
	mode tcp
	option tcplog

backend ingress-http
	balance source
	mode tcp
	server worker-0 147.75.65.87:80 check
	server worker-1 147.75.76.157:80 check

frontend ingress-https
	bind *:443
	default_backend ingress-https
	mode tcp
	option tcplog

backend ingress-https
	balance source
	mode tcp
	server worker-0 147.75.65.87:443 check
	server worker-1 147.75.76.157:443 check
We don’t need to start haproxy yet, but we will start it later after we change the values after we provision the bare metal instances.
Let’s install apache
# yum install httpd
and let’s configure apache to listen on port 80 since we will use port 80 and port 443 for haproxy. edit /etc/httpd/conf/httpd.conf and add the following line.
Listen 8080
Now let’s start apache.
# service httpd start
touch a file in /var/www/html and visit the http://<IP-Address-ewr-t1>:8080/test
# echo "hello world" > /var/www/html/test
If it doesn’t work you may look at your firewall rules, selinux context, and filesystem permissions and ownership.
You can find the official instructions for installing on bare metal here. I followed them, but wanted to share my experience here anyway.
Go to the OpenShift Install page on cloud.redhat.com and select Bare Metal. Scroll down to the bottom of that page to the Downloads section.
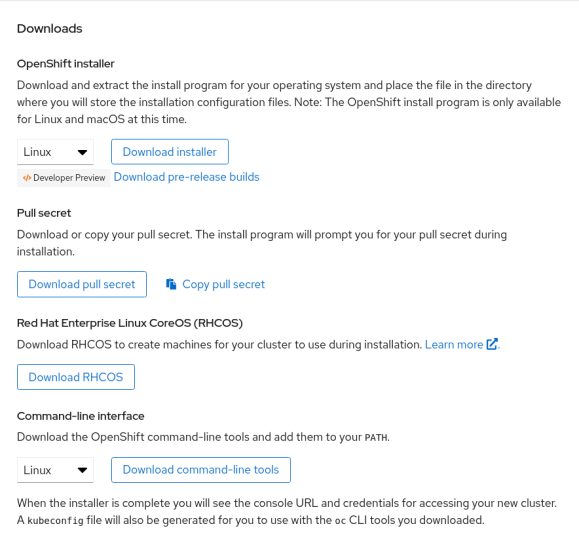
You’ll want to download all of these: the installer, pull secret, RHCOS, and command line tools.

Specifically, in the RHCOS installer you’ll want to grab the following files:
rhcos-4.3.0-x86_64-installer-initramfs.img
rhcos-4.3.0-x86_64-installer.iso
rhcos-4.3.0-x86_64-installer-kernel
rhcos-4.3.0-x86_64-metal.raw.gz
Your versions may vary. You’ll want to upload these files (pull secret excluded) to the ewr-t1 server we provisioned earlier.
Now, on ewr-t1:
Place the RHCOS installer files in a directory on /var/www/html/. This will make them accessible to the bare metal servers we will iPXE boot in Packet.net.
Extract the OpenShift client (what gives you the “oc” CLI) and drop it into /usr/bin w/ a chmod +x if needed.
Extract the OpenShift installer. The openshift installer is what generates the ignition configuration files referenced in the iPXE boot scripts below. It also provides the install-config.yaml that you’ll want to copy and modify to include your pull secret, base domain, and name of your cluster that will match your subdomain that you added in Route53 DNS.
Follow these instructions on the official documentation for how to generate the openshift installation ignition files. They are far more comprehensive than anything I can share here. 🙂 However, I will tell you a few things that I did to my install-config.yaml file:
baseDomain – change this to be equal to your domain name. In my instance this was demonstr8.net.
metadata:name: – change this to be equal to your subdomain in Route53. In my instance this was test. <– This is EASY to overlook
pullsecret: – insert your pullsecret that you downloaded from the OpenShift Install page on cloud.redhat.com.
sshKey: – This is where you should place your ssh key you want to use to be able to access bootstrap, master, and workers.
Everything else you can leave more or less the same in my experience.
Now, you can run the openshift-install command so the installer creates the manifests for your installation
# ./openshift-install create manifests --dir=<installation_directory>

WARNING There are no compute nodes specified. The cluster will not fully initialize without compute nodes.
INFO Consuming "Install Config" from target directory
The installation directory is something you created and copied your install-config.yaml into. Like so:
# ./openshift-install create manifests --dir=packetenv
In this case, the directory packetenv will contain the install-config.yaml. You’ll want to back this file up since the install command will eat it.
Be sure to modify the manifests/cluster-scheduler-02-config.yaml file after this completes and set mastersSchedulable to False as noted in the official documentation.
After that you can create the ignition configs.
# ./openshift-install create ignition-configs --dir=<installation_directory>
As the official docs say, you should see the following files.
.
├── auth
│   ├── kubeadmin-password
│   └── kubeconfig
├── bootstrap.ign
├── master.ign
├── metadata.json
└── worker.ign
You’ll use the files in auth to authenticate via the oc client and web interface. You’ll use the *.ign files to build the bootstrap, masters, and workers for your OpenShift cluster.
Now create three iPXE boot scripts with the following contents somewhere in /var/www/html on ewr-t1. Please be sure to change IP addresses, versions, etc for your environment specifics.
[root@ewr1-t1 html]# more bootstrap.boot
#!ipxe

kernel http://147.75.39.3:8080/rhcos/rhcos-4.3.0-x86_64-installer-kernel ip=dhcp rd.neednet=1 initrd=http://147.75.39.3:8080/rhcos/rhcos-4.3.0-x86_64-install
er-initramfs.img console=ttyS1,115200n8 coreos.inst=yes coreos.inst.install_dev=sda coreos.inst.image_url=http://147.75.39.3:8080/rhcos/rhcos-4.3.0-x86_64-met
al.raw.gz coreos.inst.ignition_url=http://147.75.39.3:8080/rhcos/bootstrap/packetenv/bootstrap.ign
initrd http://147.75.39.3:8080/rhcos/rhcos-4.3.0-x86_64-installer-initramfs.img
boot

[root@ewr1-t1 html]# more master.boot
#!ipxe

kernel http://147.75.39.3:8080/rhcos/rhcos-4.3.0-x86_64-installer-kernel ip=dhcp rd.neednet=1 initrd=http://147.75.39.3:8080/rhcos/rhcos-4.3.0-x86_64-install
er-initramfs.img console=ttyS1,115200n8 coreos.inst=yes coreos.inst.install_dev=sda coreos.inst.image_url=http://147.75.39.3:8080/rhcos/rhcos-4.3.0-x86_64-met
al.raw.gz coreos.inst.ignition_url=http://147.75.39.3:8080/rhcos/bootstrap/packetenv/master.ign
initrd http://147.75.39.3:8080/rhcos/rhcos-4.3.0-x86_64-installer-initramfs.img
boot

[root@ewr1-t1 html]# more worker.boot
#!ipxe

kernel http://147.75.39.3:8080/rhcos/rhcos-4.3.0-x86_64-installer-kernel ip=dhcp rd.neednet=1 initrd=http://147.75.39.3:8080/rhcos/rhcos-4.3.0-x86_64-install
er-initramfs.img console=ttyS1,115200n8 coreos.inst=yes coreos.inst.install_dev=sda coreos.inst.image_url=http://147.75.39.3:8080/rhcos/rhcos-4.3.0-x86_64-met
al.raw.gz coreos.inst.ignition_url=http://147.75.39.3:8080/rhcos/bootstrap/packetenv/worker.ign
initrd http://147.75.39.3:8080/rhcos/rhcos-4.3.0-x86_64-installer-initramfs.img
boot
We will point our bare metal servers from packet.net to these files when we boot them via iPXE.
With your OpenShift installation now configured it’s time to deploy your OpenShift environment. Provision a new server (c1.small.x86) in Packet.net. This time, select “Custom iPXE” for the operating system.


In the iPXE Script URL enter the URL to the master.boot iPXE script
http://147.75.39.3:8080/master.boot
Set the number of servers to 3 and the names of your servers to m0-2.yourdomain.com
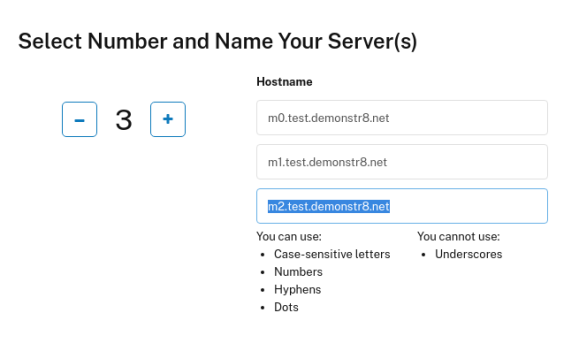
Then click Deploy Now. After a few seconds you should see the servers begin provisioning.
Now, repeat this process but for the workers (workers.boot and w1-2.your.domain.com) and the bootstrap server (bootstrap.boot and bootstrap.your.domain.com)
All servers should power on and you should see they are provided an IPV4 Address. Take these addresses and edit the haproxy.cfg on ewr-t1 to have these values. Be sure to restart haproxy! Also take these addresses and configure AWS Route53 to have the appropriate IP addresses.
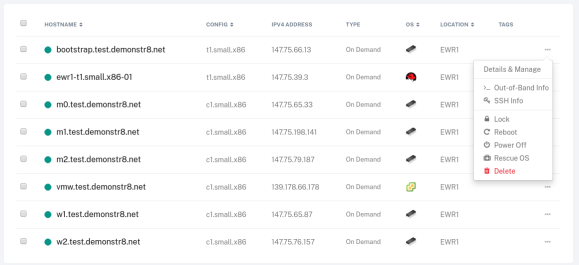
If you want to see what’s happening during the boot you can use the “out-of-band” info to gain access to a serial console on the systems to watch them iPXE and troubleshoot any issues.
On ewr-t1 you can watch the bootstrap process with the following command
./openshift-install --dir=<installation_directory> wait-for bootstrap-complete \ 1
    --log-level=info 2

INFO Waiting up to 30m0s for the Kubernetes API at https://api.test.example.com:6443...
INFO API v1.14.6+c4799753c up
INFO Waiting up to 30m0s for the bootstrap-complete event...
If everything works you should be able to source the kubeconfig file in the auth directory that was created by the openshift-install command on ewr-t1.
# export KUBECONFIG=/root/packetenv/auth/kubeconfig
# oc whoami
kube:admin
If it didn’t’ work, you’ll probably need to ssh into the bootstrap server and check out the journal entries and start debugging.
That’s it for this post, in the next post I’ll share my experience with deploying, configuring, and using CNV.
NOTE: This is a prototype for learning and not in any way a roadmap for products!
Just a few days ago I wrote a post showing how we authored an Ansible Tower Integration Guide that builds upon the reference architectures for deploying OpenShift on Amazon Web Services and adds CloudForms and Red Hat Insights to the mix. It also provided a bootstrap mechanism to make turning a fresh instance of Tower into something capable of deploying all those technologies much faster.
Building on that work, we wanted to understand what a compelling user experience might involve for someone that didn’t want to understand the internals of Ansible Tower, but just wanted an infrastructure for application development deployed on a choice of cloud providers. We also wanted to understand the limitations of visualizing all the information from the underlying technologies outside of their own interfaces. For that, we’ve built the labs-console prototype. Here is a simple diagram that shows how these pieces relate.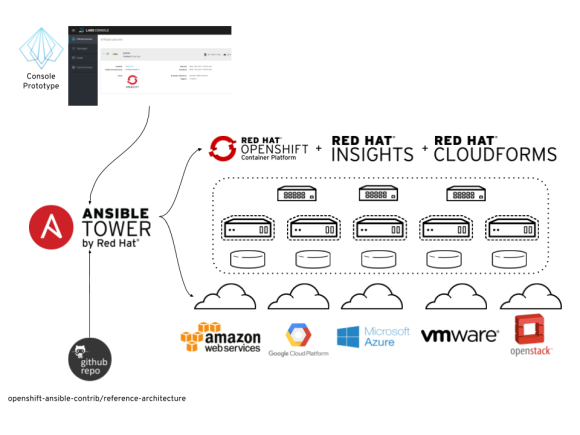
Here is a quick video demonstration of the labs-console prototype in MP4 or MOV formats. We hope to merge this work into the upstream openshift-ansible-contrib repository in the near future.
A few of us have been exploring the possibility of using the openshift-ansible-contrib reference architectures with Ansible Tower to deploy OpenShift and CloudForms on Amazon Web Services (AWS) with Red Hat Insights configured and a provider for OpenShift configured in CloudForms out of the box. We’ve written this Tower Integration Guide and some playbooks that will automate the configuration of Ansible Tower so you can start deploying much faster. We hope to contribute it back upstream soon. Below is a video that shows how it works.
For those that don’t pay attention to Hollywood news – Conscious uncoupling – a five-step process to “end your romantic union in honorable, respectful, and gracious ways” was made popular by Chris Martin and Gwyneth Paltrow. I submit that conscious uncoupling might be something companies should consider when it comes to their cloud provider. After all, it’s not that you aren’t grateful and don’t respect your cloud provider, but why commit to a single cloud provider when there are so many fish in the sea!
All hollywood references aside, uncoupling from a proprietary platform is something the Global Partner Technical Enablement (GPTE) team at Red Hat is undertaking. In 2013, the GPTE team began building a learning platform to allow sales engineers, consultants, and select partners to perform hands on technical training in order to understand how to demonstrate and implement Red Hat’s growing portfolio. The GPTE team began using Ravello Systems in order to deploy virtual environments for trainees. Ravello Systems provided capabilities such as Nested Virtualization, Overlay Networking and Storage that were needed for much of the Red Hat portfolio (particularly the infrastructure technologies) to function properly. The team used Red Hat CloudForms to provide self-service with automatic retirement of applications on the Ravello System.
Fast forward to 2016 and the GPTE team’s Red Hat Product Demo System (RHPDS) runs several hundred applications that are comprised of thousands of virtual machines concurrently. It has been used to teach thousands of Red Hatters and partners in the field how to demonstrate and implement Red Hat’s technologies successfully. However, there have been two key challenges with this system.
First, the Ravello System uses a concept called a blueprint to describe an environment. The blueprint is a concept native to the Ravello System and not something that is supported on any cloud provider. Any logic put into the blueprint is by definition not portable or usable by other teams at Red Hat that don’t use the Ravello system. This runs counter to the culture of open source at Red Hat and does not allow contribution to the demonstrations and training environments to flow back from participants. The team needed to turn participants into contributors.
Second, demonstrations developed on the Ravello system were limited to running only on the Ravello system and could not be deployed in other labs across Red Hat, or even customer environments. This severely limited buy-in from other groups that had their own labs or otherwise felt more comfortable learning in their own way. Many field engineers at Red Hat and partners run OpenStack, oVirt (RHEV), VMware, or other virtualization platform in their labs. These users should be able to deploy demonstration and training environments on the provider of their choice. The team needed to allow re-use of demonstrations and training environments across cloud providers.
The GPTE team wanted to address these two issues in order to increase reuse and spur contribution to the demonstrations themselves from the community of sales engineers. They found an answer in Ansible. By including Ansible in the GPTE platform it will be possible to separate the configuration of the blueprint in the Ravello system from the configuration of the demonstration or training environment. It will also allow automated update of the environments in Ravello any time a code change is made. The result – field engineers can re-use any of the demonstrations and training environments created on the GPTE platform in their own labs and can even share fixes or improvements back. This small change will lead to a greater amount of user acceptance and lower the burden of building and maintaining the technical enablement platform at Red Hat.
If you are interested in learning more about how the GPTE team is consciously uncoupling themselves from a proprietary description and automated the process or if you are interested in deploying the demonstrations in your own lab please check out the Red Hat Demos repository on GitHub where our work is in progress. Contributions welcome!
Disclaimer: This is not a roadmap for Red Hat, just a concept based on upstream projects and research.
First, a bit of back story just so you know how I’ve arrived about what this post talks about.
I’ve been researching how organizations design reusable services and suggesting how it might be possible to improve the lives of service designers (what some call a DevOps Engineers) by:
Originally, several Red Hatters and I took a look at how the ManageIQ community (the upstream for Red Hat CloudForms) could orchestrate a repeatable deployment of an application that included resources from OpenShift and OpenStack using Ansible playbooks via Ansible Tower. Here is a video of that and a post explaining why we did this. We identified some of the gaps we would like to see fixed and were excited to see ManageIQ’s RC1 including integration with Ansible Tower to fill many of those gaps.
We also conducted research and built empathy with users within some of our larger customers and discovered several personas and patterns that were attempting to design reusable services that would help deliver applications to product faster with higher quality. We created a concept with the information we had and floated it by the users and had positive feedback.
When we presented this research, analysis, and concept around a service designer user experience to both the ManageIQ and OpenShift teams we had a mixed response. The ManageIQ team reacted positively while the OpenShift team felt it conflicted with plans they had to integrate concepts from the fabric8 community into OpenShift. This was a fair point of view, so we decided to do more digging.
This is when I began looking at the fabric8 community – an opinionated open source microservices platform that several Red Hatters are working on. I encourage you to go have a watch of some of their demonstrations so you can see how they are attempting to make application delivery easier.
I submit that by extending the reach of fabric8 beyond the applications developed on the container application platform (openshift) and deploying operations tooling it will be possible to:
What if we were to start including both operations tools and the ability to automate beyond the container application platform in the Continuous Delivery pipeline by deploying the needed tools to do this during the creation of our cd-pipeline?
Now, why would we want to actually provision our automation (in this case Ansible) and our management platform (in this case ManageIQ) as part of a developers request to create a new application?
Well, it may have several benefits over long lived automation and management platforms.
How might this work? Here is a simple walk through with some visuals to give you an idea.
First, it would be nice to have both Ansible and manageIQ as applications available within fabric8. The image below shows what this might look like in when a user selects “Create New App”.

Once the user deploys the cd-pipeline application (that already includes gogs, jenkins, jboss forge, docker-registry, and Nexus) they would also have fully functional ManageIQ and Ansible pods running and integrated into their environments pipeline.

Now that we have Ansible running as a pod and Jenkins is aware of it, the Jenkinsfile (what defines your pipeline in Jenkins) could be annotated to allow for the use of Ansible Playbooks within the pipeline itself. This would allow for the pipeline to automate things outside of OpenShift, such as Amazon Route 53 DNS or maybe even make some changes to a hadoop cluster, extending the automation beyond the container application platform (OpenShift).

Here is what it might look like to review your build log in Fabric8 if a developer wanted their deployment to also provision a new database (outside of OpenShift) and update it’s schema.

And finally, since when the cd-pipeline app was deployed it automatically wired the ManageIQ pod to your openshift environment it would be possible to have an operational view of containers and even see what playbooks and/or jenkins pipelines they were derived from. This would be handy for troubleshooting any issues of a running application or even starting to tie the worlds of application lifecycle management together with operations management. “How much more real memory is this consuming on the physical hosts when I make this code change?”

I hope you find this blog post useful. I’d love to hear your feedback and thoughts or continue this discussion. Send me a tweet @jameslabocki
In a previous post I outlined the common problems organizations face across both their traditional IT environments and new emerging IT environments. These included:
Today’s applications are often monolithic and bringing applications from development to production is a painful and lengthy process. Even if applications are modernized, today’s scale-up infrastructure doesn’t provide the programmability and scalability required. Finally, organizations need to be able to operate and manage new modern applications and infrastructure seamlessly.
Red Hat Cloud Suite is an integrated solution for developing container based applications on massively scalable infrastructure with all the management required to operate both. With OpenShift Enterprise, organizations can build microservices based applications allowing for greater change velocity. Also, they can reduce friction between development and operations by using a continuous integration and deployment pipeline for release. Red Hat OpenStack Platform allows organizations to deliver massively scalable public-cloud like infrastructure based on OpenStack to support container based applications. Finally, Red Hat CloudForms provides seamless management of OpenShift and OpenStack along with other major virtualization, private, and public cloud infrastructures. Best of all, these are all built from leading open source communities without a line of proprietary code – ensuring access to the greatest amount of innovation. It also comes with access to Red Hat’s proactive operations offering, Red Hat Insights allowing you to compare your environment with the wisdom of thousands of solved problems and millions of support cases.
I’d like to show you a quick demonstration of how Red Hat Cloud Suite is helping organizations modernize their development and operations. In the demo below I demonstrate how an organization can develop applications faster, on scalable cloud infrastructure, with a single pane of management between both.
I hope you found this demonstration useful!
If you are a Red Hatter or a Red Hat Partner, this demonstration is available in the Red Hat Product Demo System and is named “Red Hat Cloud Suite Modernize Development and Operations”.
In order to deliver services faster to their customers organizations need to ensure their development and operations teams work in unison. Over the last weeks and months I’ve been fortunate enough to spend time with several organizations in industries ranging from telecommunications, to financial services, to transportation to gain a better understanding of how they are allowing their development and operations teams to work more smoothly together and to observe where they are struggling. In this post I’ll attempt to summarize the common approaches and articulate the opportunity for improving service design.
Prior to explaining the common approaches that development and operations teams have implemented or plan to implement let’s examine two common ways development and operations work together when it comes to repeatability.
Using Repeatable Deployments
In this approach, a member of the development team (sometimes a developer, but often a system administrator within the development team itself) makes a request for a given service. This service may require approvals and fall under some type of governance, but it is automatically instantiated. Details about the service are then delivered back to the requester. The requester then controls the lifecycle of everything within the service, such as updating and configuring the application server and deploying the application itself.
Using Repeatable Builds
In this approach, a member of the development team (most often a developer) requests a given service. This service is automatically deployed and the requester is provided an endpoint in which to interact with the service and an endpoint (usually a source control system) to use for modification of the service. The requester is able to modify certain aspects of the service (most often the application code itself) and these modifications are automatically propagated to the instantiated service.
There are several patterns that I have observed with regards to the implementation of repeatability.
Repeatable Deployment
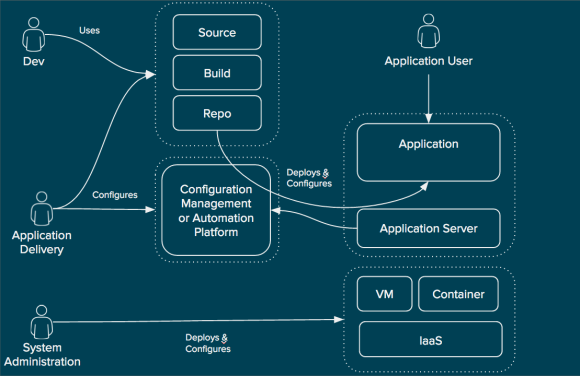
First is what I call “Repeatable Deployment”. It is probably familiar to anyone who has been in IT for the last 20 years. System administration teams deploy and configure the infrastructure components. This includes provisioning of the virtual infrastructure, such as virtual switches, storage, and machines and installing the operating system (or using a golden image). When it comes to containers, the system administration teams believe they will also provision the container and secure it in the low automation scenario.

Repeatable Deployments (High Level)
Once the infrastructure has been configured it is handed over to the application delivery teams. These teams deploy the necessary application servers to support the application that will run. This often includes application server clustering configuration and setting database connection pool information. These are things that developers and system administrators don’t necessarily know or care about. Finally, the application is deployed from a binary that is in a repository. This can be a vendor supplied binary or something that came from a build system that the development team created.
What is most often automated in this pattern is the deployment of the infrastructure and sometimes the deployment and configuration of the application server. The deployment of the binary is not often automated and the source to image process is altogether separated from the repeatable deployment of the infrastructure and application server.
Custom Repeatable Build
Next is what I call “Custom Repeatable Build”. This pattern is common in organizations that began automating prior to the emergence of prescriptive methods of automation or because they had other reasons like flexibility or expertise that they wanted to leverage.
Custom Repeatable Build (High Level)
In this pattern system administration teams are still responsible for deploying and configuring the infrastructure including storage, network, and compute as a virtual machine or container. This is often automated using popular tools. This infrastructure is then handed over as an available “unit” for the application delivery teams.
The application delivery teams in this pattern have taken ownership of the process of taking source to image and configuring the application server and delivering binary to the application server. This is done through the use of a configuration management or automation platform.
This pattern greatly decreases the time it takes to move code from development to operational. However, the knowledge required to create the source to image process and automate the deployment is high. As more application development teams are onboarded the resulting complexity also greatly increases. In one instance it took over 3 months to onboard a single application into this pattern. In a large environment with thousands of applications this would be untenable.
Prescriptive Repeatable Build
Finally, there is what I call the “Prescriptive Repeatable Build”. Similar to the other patterns the infrastructure including storage, network, and compute as a virtual machine or container are provisioned and configured by the system administration teams. Once this is complete a PaaS team provisions the PaaS using the infrastructure resources.

Prescriptive Repeatable Build (High Level)
The PaaS exposes a self-service user interface for developers to obtain a new environment. Along with an endpoint for the instantiated service the developer is provided with an endpoint for manipulating the configuration of the service (usually the application code itself, but sometimes other aspects as well).
General Trends
Most organizations have multiple service design and delivery patterns happening at the same time. Most also want to move from repeatable deployment to prescriptive repeatable build wherever possible. This is because high automation can generally be equated with delivery of more applications in a shorter period of time. It also provides a greater degree of standardization thus reducing complexity.
Pains, Challenges, and Limitations
There are several pains, challenges, and limitations within each pattern.
The Repeatable Deployment pattern is generally the easiest to implement of the three. It generally includes automating infrastructure deployments and sometimes even automates the configuration of the application servers. Still, the disconnected nature of development from the deployment, configuration, and operation of the application itself means the repeatable deployment does not provide as much value when it comes to delivering applications faster. It also tends to lead to greater amounts of human error when deploying applications since it often relies on tribal knowledge or manual tasks between development and operations to run an application.
The Custom Repeatable Builds provide end users with a means of updating their applications automatically. This pattern also accommodates the existing source to image process, developer experience, and business requirements without requiring large amounts of change. This flexibility does come with a downside in that it takes a long time to onboard tenants. As mentioned earlier, we found that it can take months to onboard a simple application. Since large organizations typically have thousands of applications and potentially hundreds of development teams this pattern also leads to an explosion of complexity.
The Prescriptive Repeatable Builds provide the most standardization and allows developers to take source to a running application quickly. However, it often requires a significant effort to change the build process to fit into it’s opinionated deployment style. This leads to a larger risk to user acceptance depending on how application development teams behave in an organization. In using an opinionated method, however, the complexity of the end state can be reduced.
Finally, moving between each of these patterns is painful for organizations. In most cases, it is impossible to leverage existing investments from one pattern in another. This means redesigning and reimplementing service design each time.
How do Organizations Decide which Approach is Best?
Deciding which pattern is best is dependent on many factors including (but not limited to):
The difference in pattern used on a per application basis is often the reason multiple patterns exist inside large organizations. For example, in a large organization that has grown through merger and acquisition there may be some application delivery teams that are building a Platform as a Service (PaaS) to enable prescriptive repeatable builds while others are using repeatable deployments and still others have hand crafted customized repeatable builds.
Principles for a Successful Service Design Solution
We have identified several principles that we believe a good service design solution should adhere to. This is not an exhaustive list. In no priority order they are:
Improved Service Design Concept
An opportunity exists to greatly improve the service design experience. It can be possible to allow service designers to more easily design services using the widest range of items, accommodating the patterns required by the multiple teams inside most organization all while allowing the organization to evolve towards the prescriptive repeatable build pattern without losing their investments along the way. This concept allows for “services as code” and would provide a visual editor.
The concept begins with the discovery of existing elements within an organization’s platforms. For example, the discovery of a heat template from an OpenStack based IaaS platform or discovery of available repositories from a content system such as Nexus, Artifactory, or Red Hat Satellite. Discovery of these elements on a continual basis and ensuring they are placed into a source control system (or leveraging them from their existing source control systems).
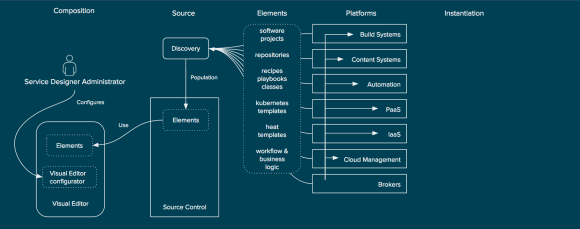
Discovery of Element for Service Composition
Once the elements are discovered and populated the visual editor can allow for the service designer to author a new service composition. This service composition would never create elements, but would describe how the elements are related.
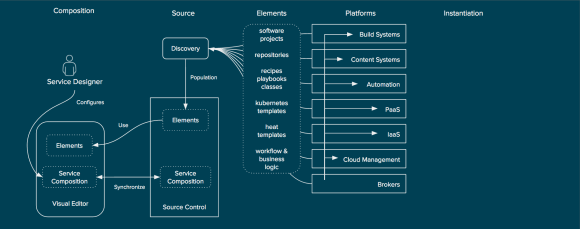
Composition of Elements
While out of scope for the concept of service design the service composition could be visualized to the service consumer within any number of service catalogs that can read the service composition. Also outside of the scope of service design (although also important), brokers can utilize the service composition to instantiate a running instance of the service across the platforms.
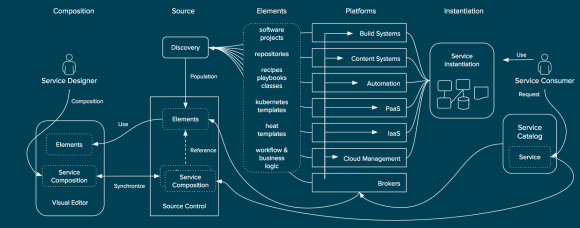
Publishing and Instantiation
Why does this matter to Red Hat?
Red Hat has a unique opportunity to provide a uniform way of designing services across all three patterns using both their products as well as other leading solutions in the market. In providing a uniform way it would increase the usability and understanding between teams within our customers and allow for an easier transition between the patterns of repeatability while still allowing users to choose what pattern is right for them. This means a reduction in friction when introducing repeatable service delivery solutions. This would directly benefit products that provide repeatable deployments such as Ansible, Satellite, and CloudForms by improving the user experience. Then, as a customer matures, the concepts discussed here would provide them with an evolutionary path to repeatable builds that would not require reengineering a solution. This would greatly benefit products such as OpenStack and OpenShift.
What’s Next?
Currently, we are working through the user experience for designing a sample application within the concept in more detail. Once we complete this we hope to build a functional prototype of the concept and continue to improve the design to obtain market validation.
If you are a user that is interested in participating in our research or participating in co-creation please email me at jlabocki <at> redhat.com.
In a previous post I outlined the common problems organizations face across both their traditional IT environments (sometimes called mode-1) and new emerging IT environments (sometimes called mode-2). These included:
I’d like to show you a quick demonstration of how Red Hat is delivering scalable infrastructure with the capabilities that enterprises demand. Red Hat Enterprise Linux OpenStack Platform delivers scale-out private cloud capabilities with a stable lifecycle and large ecosystem of supported hardware platforms. Many organizations are building their next generation cloud infrastructures on OpenStack because it provides an asynchronous architecture and is API centric allowing for greater scale and greater efficiency in platform management. OpenStack does not, however, provide functionality such as chargeback, reporting, and policy driven automation for tenant workloads and those projects that aspire to do so are generally focused solely on OpenStack. This is not realistic in an increasingly hybrid world – and enterprises that are serious about OpenStack need these capabilities. By using Red Hat CloudForms together with Red Hat Enterprise Linux OpenStack Platform it’s possible to provide capabilities such as reporting, chargeback, and auditing of tenant workloads across a geographically diverse deployment. In the demo below I demonstrate how chargeback across a multi-site OpenStack deployment works.
I hope you found this demonstration useful!
P.S. – If you are a Red Hatter or a Red Hat Partner, this demonstration is available in the Red Hat Product Demo System and is named “Red Hat Cloud Suite Reporting Demonstration”.
