I recently decided to deploy OpenShift 4.3 and CNV 2.2 on Packet.net. I wanted to share my experience in the hope it my help others. Of course, you should always default to the real documentation. Lots of people from Red Hat helped me along the way, so thanks to all of you!
Before we dive into the step by step here are some things you should know:
- I used AWS Route53 for DNS for no other reason then I already had an account and I didn’t feel like running my own bind server.
- The packet.net environment will cost around $70/day. There is a way to deploy this on a smaller footprint (ask Rhys on twitter) for learning purposes, but I wanted the experience of deploying on bare metal to really learn how everything works.
- There are a lot of steps which could have been automated, but I wanted to show the step by step for the purposes of learning.
- I assume you have an account for Packet.net, AWS, and Red Hat that give you proper access to things like creating/editing DNS entries, downloading software, and provisioning servers. I also assume you uploaded ssh keys to Packet.net.
- If you see anything missing just let me know on twitter.
What you’ll have when you are done
This diagram attempts to explain what you’ll have when you are done.
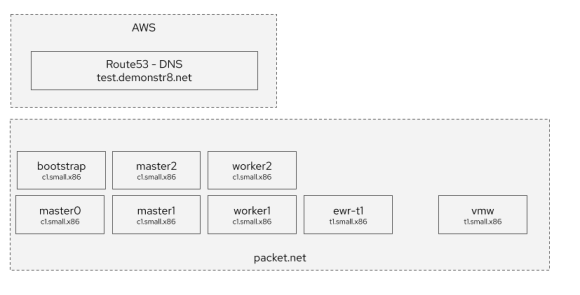
You will have:
- worker1-2 – OpenShift workers
- master0-2 – OpenShift masters
- bootstrap – the bootstrap server used during installation
- ewr-t1 – a RHEL7 instance running haproxy, oc client, hosting NFS, apache
- vmw – an esxi instance running vCenter nested. I won’t cover this here as @practicalAndrew is the one who kindly installed this for me.
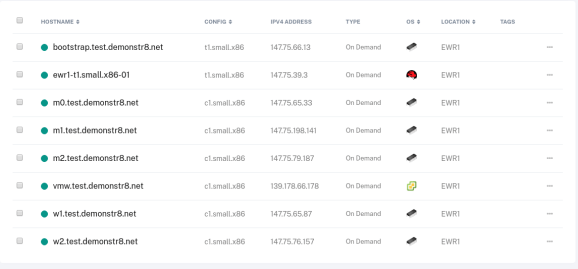
Your servers in Packet.net will look like this.
The overall process will go something like this
- Deploy ewr-t1 and configure ha proxy, NFS hosting, apache, etc.
- Use the OpenShift installation binary to create manifests, ignition files, etc.
- Deploy bootstrap, worker1-2, and master0-2 via iPXE in packet.net.
iPXE files will be hosted via Apache on ewr-t1. - When bootstrap, worker1-2, and master0-2 receive their IP addresses reconfigure DNS in AWS Route 53 with appropriate IP addresses and reconfigure haproxy.cfg with appropriate IP addresses.
- Wait for RHEL CoreOS/OpenShift 4.3 to deploy
- Log in and install the OpenShift Virtualization (CNV) Operator (later post)
- Configure the OpenShift Virtualization (CNV) Operator (later post)
- Start working on your big ideas. 🙂
Let’s get started ….
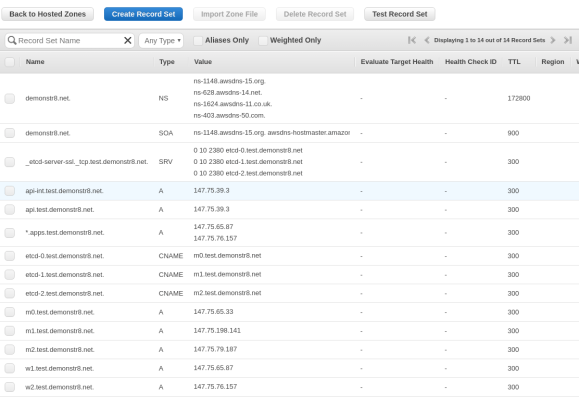
Configuring DNS in AWS Route 53
You’ll want to create the records as shown in the image below in Route 53. I created a domain named demonstr8.net with a subdomain of test. We will change the values of the entries after we iPXE the bare metal servers in Packet.net. This is because we can’t control what IP addresses our machines will receive. The friendly folks at packet.net are working on project tinkerbell to help address this and make life easier.
Deploying ewr-t1
The first step is deploying a small instance that will host various services. If you don’t feel like learning all of this you could check out Christian Hernandez‘s ocp4-helpernode that makes this easier. Another great resource is Mike Hepburn’s disconnected install markup here.
For now, just deploy a single server with the following characteristics:
- datacenter = Any core DC should work, I used ewr because I love Newark airport. 😉
- flavor = t1.small.x86-01
- Operating System = Licensed, RHEL
Next, deploy a 100GB storage volume and connect it to ewr-t1. We will do this so we can have some storage for a NFS export for persistent volumes in OpenShift. You’ll want to follow this handy guide for attaching the volume. I mounted the file system on /mnt/data. In the end you should have something that looks like this.
[root@ewr1-t1 ~]# df -h
Filesystem Size Used Avail Use% Mounted on
/dev/sda3 72G 9.0G 59G 14% /
devtmpfs 3.9G 0 3.9G 0% /dev
tmpfs 3.9G 84K 3.9G 1% /dev/shm
tmpfs 3.9G 153M 3.8G 4% /run
tmpfs 3.9G 0 3.9G 0% /sys/fs/cgroup
tmpfs 798M 4.0K 798M 1% /run/user/0
/dev/mapper/volume-9201b23a1 99G 61M 94G 1% /mnt/data
[root@ewr1-t1 ~]#
Now let’s set up the following on the server: NFS, HAproxy, and Apache. Before we do that let’s add the repositories we will need.
# yum-config-manager --add-repo rhel-7-servers-rpms
# yum-config-manager --add-repo rhel-7-servers-extras-rpms
Let’s also add all the ports to the firewall that we will need for haproxy, nfs, apache.
# firewall-cmd --add-port=80/tcp
# firewall-cmd --add-port=443/tcp
# firewall-cmd --add-port=8080/tcp
# firewall-cmd --add-port=8088/tcp
# firewall-cmd --add-port=6443/tcp
# firewall-cmd --add-port=22623/tcp
# firewall-cmd --add-port=2376/tcp
# firewall-cmd --add-port=2376/udp
# firewall-cmd --add-port=111/tcp
# firewall-cmd --add-port=662/tcp
# firewall-cmd --add-port=875/tcp
# firewall-cmd --add-port=892/tcp
# firewall-cmd --add-port=2049/tcp
# firewall-cmd --add-port=32803/tcp
# firewall-cmd --add-port=111/udp
# firewall-cmd --add-port=662/udp
# firewall-cmd --add-port=875/udp
# firewall-cmd --add-port=892/udp
# firewall-cmd --add-port=2049/udp
# firewall-cmd --add-port=32803/udp
# firewall-cmd --runtime-to-permanent
Configure NFS
Let’s install nfs. This will be used to provide persistent storage to our OpenShift environment.
# yum install nfs-utils
and then set up the /etc/exports file with the following
/mnt/data *(rw,root_squash)
and let’s start nfs
# service nfs start
You can validate your are exporting nfs with the following
# exportfs
/mnt/data <world>
Configure HAproxy
Let’s install haproxy. Haproxy will be used to provide L4 load balancing to our OpenShift environment.
# yum install haproxy
and then set up the /etc/haproxy/haproxy.cfg file with the following. Note, we will change these values once we actually provision the environment.
defaults
	mode                	http
	log                 	global
	option              	httplog
	option              	dontlognull
	option forwardfor   	except 127.0.0.0/8
	option              	redispatch
	retries             	3
	timeout http-request	10s
	timeout queue       	1m
	timeout connect     	10s
	timeout client      	300s
	timeout server      	300s
	timeout http-keep-alive 10s
	timeout check       	10s
	maxconn             	20000

# Useful for debugging, dangerous for production
listen stats
	bind :9000
	mode http
	stats enable
	stats uri /

frontend openshift-api-server
	bind *:6443
	default_backend openshift-api-server
	mode tcp
	option tcplog

backend openshift-api-server
	balance source
	mode tcp
	server master-0 147.75.65.33:6443 check
	server master-1 147.75.198.141:6443 check
	server master-2 147.75.79.187:6443 check

frontend machine-config-server
	bind *:22623
	default_backend machine-config-server
	mode tcp
	option tcplog

backend machine-config-server
	balance source
	mode tcp
        server master-0 147.75.65.33:22623 check
        server master-1 147.75.198.141:22623 check
        server master-2 147.75.79.187:22623 check

frontend ingress-http
	bind *:80
	default_backend ingress-http
	mode tcp
	option tcplog

backend ingress-http
	balance source
	mode tcp
	server worker-0 147.75.65.87:80 check
	server worker-1 147.75.76.157:80 check

frontend ingress-https
	bind *:443
	default_backend ingress-https
	mode tcp
	option tcplog

backend ingress-https
	balance source
	mode tcp
	server worker-0 147.75.65.87:443 check
	server worker-1 147.75.76.157:443 check
We don’t need to start haproxy yet, but we will start it later after we change the values after we provision the bare metal instances.
Configure Apache
Let’s install apache
# yum install httpd
and let’s configure apache to listen on port 80 since we will use port 80 and port 443 for haproxy. edit /etc/httpd/conf/httpd.conf and add the following line.
Listen 8080
Now let’s start apache.
# service httpd start
touch a file in /var/www/html and visit the http://<IP-Address-ewr-t1>:8080/test
# echo "hello world" > /var/www/html/test
If it doesn’t work you may look at your firewall rules, selinux context, and filesystem permissions and ownership.
Deploying OpenShift 4.3
You can find the official instructions for installing on bare metal here. I followed them, but wanted to share my experience here anyway.
Go to the OpenShift Install page on cloud.redhat.com and select Bare Metal. Scroll down to the bottom of that page to the Downloads section.
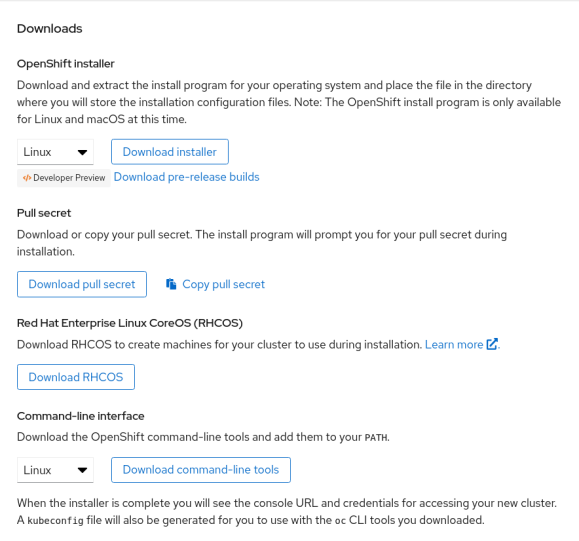
You’ll want to download all of these: the installer, pull secret, RHCOS, and command line tools.
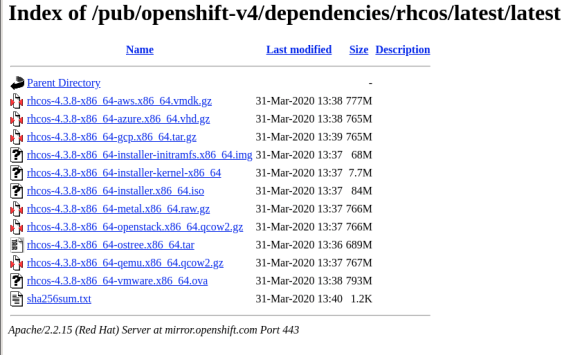
Specifically, in the RHCOS installer you’ll want to grab the following files:
rhcos-4.3.0-x86_64-installer-initramfs.img
rhcos-4.3.0-x86_64-installer.iso
rhcos-4.3.0-x86_64-installer-kernel
rhcos-4.3.0-x86_64-metal.raw.gz
Your versions may vary. You’ll want to upload these files (pull secret excluded) to the ewr-t1 server we provisioned earlier.
Now, on ewr-t1:
Place the RHCOS installer files in a directory on /var/www/html/. This will make them accessible to the bare metal servers we will iPXE boot in Packet.net.
Extract the OpenShift client (what gives you the “oc” CLI) and drop it into /usr/bin w/ a chmod +x if needed.
Extract the OpenShift installer. The openshift installer is what generates the ignition configuration files referenced in the iPXE boot scripts below. It also provides the install-config.yaml that you’ll want to copy and modify to include your pull secret, base domain, and name of your cluster that will match your subdomain that you added in Route53 DNS.
Follow these instructions on the official documentation for how to generate the openshift installation ignition files. They are far more comprehensive than anything I can share here. 🙂 However, I will tell you a few things that I did to my install-config.yaml file:
baseDomain – change this to be equal to your domain name. In my instance this was demonstr8.net.
metadata:name: – change this to be equal to your subdomain in Route53. In my instance this was test. <– This is EASY to overlook
pullsecret: – insert your pullsecret that you downloaded from the OpenShift Install page on cloud.redhat.com.
sshKey: – This is where you should place your ssh key you want to use to be able to access bootstrap, master, and workers.
Everything else you can leave more or less the same in my experience.
Now, you can run the openshift-install command so the installer creates the manifests for your installation
# ./openshift-install create manifests --dir=<installation_directory>

WARNING There are no compute nodes specified. The cluster will not fully initialize without compute nodes.
INFO Consuming "Install Config" from target directory
The installation directory is something you created and copied your install-config.yaml into. Like so:
# ./openshift-install create manifests --dir=packetenv
In this case, the directory packetenv will contain the install-config.yaml. You’ll want to back this file up since the install command will eat it.
Be sure to modify the manifests/cluster-scheduler-02-config.yaml file after this completes and set mastersSchedulable to False as noted in the official documentation.
After that you can create the ignition configs.
# ./openshift-install create ignition-configs --dir=<installation_directory>
As the official docs say, you should see the following files.
.
├── auth
│   ├── kubeadmin-password
│   └── kubeconfig
├── bootstrap.ign
├── master.ign
├── metadata.json
└── worker.ign
You’ll use the files in auth to authenticate via the oc client and web interface. You’ll use the *.ign files to build the bootstrap, masters, and workers for your OpenShift cluster.
Now create three iPXE boot scripts with the following contents somewhere in /var/www/html on ewr-t1. Please be sure to change IP addresses, versions, etc for your environment specifics.
[root@ewr1-t1 html]# more bootstrap.boot
#!ipxe

kernel http://147.75.39.3:8080/rhcos/rhcos-4.3.0-x86_64-installer-kernel ip=dhcp rd.neednet=1 initrd=http://147.75.39.3:8080/rhcos/rhcos-4.3.0-x86_64-install
er-initramfs.img console=ttyS1,115200n8 coreos.inst=yes coreos.inst.install_dev=sda coreos.inst.image_url=http://147.75.39.3:8080/rhcos/rhcos-4.3.0-x86_64-met
al.raw.gz coreos.inst.ignition_url=http://147.75.39.3:8080/rhcos/bootstrap/packetenv/bootstrap.ign
initrd http://147.75.39.3:8080/rhcos/rhcos-4.3.0-x86_64-installer-initramfs.img
boot

[root@ewr1-t1 html]# more master.boot
#!ipxe

kernel http://147.75.39.3:8080/rhcos/rhcos-4.3.0-x86_64-installer-kernel ip=dhcp rd.neednet=1 initrd=http://147.75.39.3:8080/rhcos/rhcos-4.3.0-x86_64-install
er-initramfs.img console=ttyS1,115200n8 coreos.inst=yes coreos.inst.install_dev=sda coreos.inst.image_url=http://147.75.39.3:8080/rhcos/rhcos-4.3.0-x86_64-met
al.raw.gz coreos.inst.ignition_url=http://147.75.39.3:8080/rhcos/bootstrap/packetenv/master.ign
initrd http://147.75.39.3:8080/rhcos/rhcos-4.3.0-x86_64-installer-initramfs.img
boot

[root@ewr1-t1 html]# more worker.boot
#!ipxe

kernel http://147.75.39.3:8080/rhcos/rhcos-4.3.0-x86_64-installer-kernel ip=dhcp rd.neednet=1 initrd=http://147.75.39.3:8080/rhcos/rhcos-4.3.0-x86_64-install
er-initramfs.img console=ttyS1,115200n8 coreos.inst=yes coreos.inst.install_dev=sda coreos.inst.image_url=http://147.75.39.3:8080/rhcos/rhcos-4.3.0-x86_64-met
al.raw.gz coreos.inst.ignition_url=http://147.75.39.3:8080/rhcos/bootstrap/packetenv/worker.ign
initrd http://147.75.39.3:8080/rhcos/rhcos-4.3.0-x86_64-installer-initramfs.img
boot
We will point our bare metal servers from packet.net to these files when we boot them via iPXE.
Deploying Bootstrap, Masters, and Workers
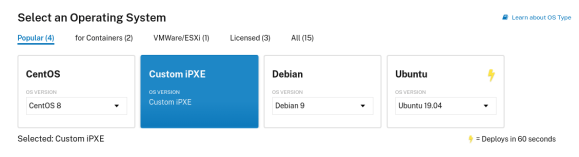
With your OpenShift installation now configured it’s time to deploy your OpenShift environment. Provision a new server (c1.small.x86) in Packet.net. This time, select “Custom iPXE” for the operating system.


In the iPXE Script URL enter the URL to the master.boot iPXE script
http://147.75.39.3:8080/master.boot
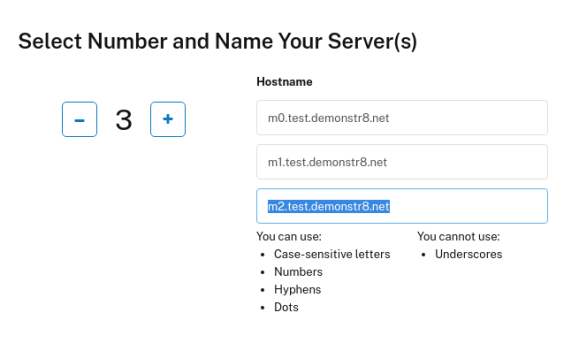
Set the number of servers to 3 and the names of your servers to m0-2.yourdomain.com
Then click Deploy Now. After a few seconds you should see the servers begin provisioning.
Now, repeat this process but for the workers (workers.boot and w1-2.your.domain.com) and the bootstrap server (bootstrap.boot and bootstrap.your.domain.com)
All servers should power on and you should see they are provided an IPV4 Address. Take these addresses and edit the haproxy.cfg on ewr-t1 to have these values. Be sure to restart haproxy! Also take these addresses and configure AWS Route53 to have the appropriate IP addresses.
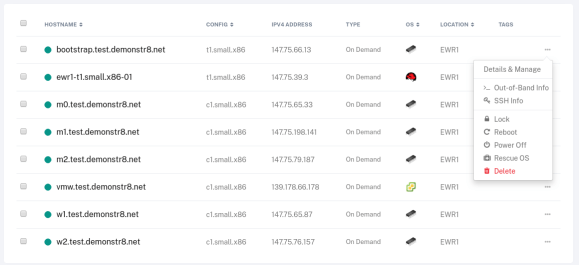
If you want to see what’s happening during the boot you can use the “out-of-band” info to gain access to a serial console on the systems to watch them iPXE and troubleshoot any issues.
On ewr-t1 you can watch the bootstrap process with the following command
./openshift-install --dir=<installation_directory> wait-for bootstrap-complete \ 1
    --log-level=info 2

INFO Waiting up to 30m0s for the Kubernetes API at https://api.test.example.com:6443...
INFO API v1.14.6+c4799753c up
INFO Waiting up to 30m0s for the bootstrap-complete event...
If everything works you should be able to source the kubeconfig file in the auth directory that was created by the openshift-install command on ewr-t1.
# export KUBECONFIG=/root/packetenv/auth/kubeconfig
# oc whoami
kube:admin
If it didn’t’ work, you’ll probably need to ssh into the bootstrap server and check out the journal entries and start debugging.
That’s it for this post, in the next post I’ll share my experience with deploying, configuring, and using CNV.
